Understanding C# List
The List class in C#, which is a versatile collection type. It's based on a dynamic array as its internal data structure, allowing for efficient manipulation of elements. When you create a List, you can specify a default initial capacity to optimize memory usage right from the start. This capacity is the number of elements that the list can initially hold without reallocating memory.
In Layla Porter’s video "C# for Beginners Part 7 - Querying Data with LINQ," she dives deep into the functionality of C# lists, demonstrating how to leverage LINQ (Language Integrated Query) to query data efficiently. This article breaks down the key concepts and examples from Layla’s video, offering a comprehensive understanding of C# lists for beginners.
Introduction to C# Lists
As Layla mentions at the start of her video (0:03), a C# list is a versatile data structure that allows developers to store and manipulate a collection of elements. Unlike arrays, lists can dynamically resize, making them ideal for scenarios where the number of elements is not known upfront.
Using a List is straightforward. You can add elements to it using the Add method, which appends the specified object to the end of the list. The list uses a zero-based index, meaning the first element is accessed at index 0. You can also access elements by a specified index using square brackets ([]) notation.
For iterating through the list, you can use a foreach loop, which iterates over each element in the order they appear. If you need to find the first occurrence of a specific element, you can use methods like IndexOf with a predicate, which searches based on a specified condition.
List is strongly typed, meaning it holds objects of a specific type (T). This ensures type safety and enables the use of methods and properties defined by the specified object type. By default, List uses a default hash function to organize elements efficiently.
Let's have a deep look at the working of List and List class methods as demonstrated by Layla in her video.
Creating a List
When creating a list in C#, you can set a specified initial capacity to optimize the internal data structure. Lists are versatile and can be initialized from a specified collection of elements. You can access items using an int index, and iterate through them using a foreach loop. Unlike dictionaries, lists do not rely on a default hash function, and they store strongly typed objects ensuring type safety and consistency in your data management.
At (0:44), Layla creates a list of cheeses, illustrating how to initialize and populate a list. In C#, a list can be created using the List class, where T represents the type of elements contained in the list.
List<Cheese> cheeseList = new List<Cheese>
{
    new Cheese(1, "Stilton", 3.0m, 5),
    new Cheese(2, "Cheddar", 2.25m, 3),
    new Cheese(3, "Pineapple", 3.5m, 1),
    new Cheese(4, "Brie", 5.5m, 2),
    new Cheese(5, "Roquefort", 3.5m, 5),
};
List<Cheese> cheeseList = new List<Cheese>
{
new Cheese(1, "Stilton", 3.0m, 5),
new Cheese(2, "Cheddar", 2.25m, 3),
new Cheese(3, "Pineapple", 3.5m, 1),
new Cheese(4, "Brie", 5.5m, 2),
new Cheese(5, "Roquefort", 3.5m, 5),
};In the above example, Layla creates a List<Cheese> using the collection initializer syntax to define and populate the list with Cheese objects. She specifies properties like ID, name, price, and strength for each cheese object that corresponds to the Cheese class, demonstrating the creation and initialization of a list in C#.
Iterating Through the Cheese List to Print ID and Name
Layla Porter demonstrates how to use a foreach loop to iterate over the cheeseList and print only the ID and Name of each cheese. Below is the code along with an explanation:
foreach (var cheese in cheeseList)
{
    Console.WriteLine($"ID: {cheese.ID}, Name: {cheese.Name}");
}
foreach (var cheese in cheeseList)
{
Console.WriteLine($"ID: {cheese.ID}, Name: {cheese.Name}");
}In the above code, Layla uses a foreach loop to traverse the cheeseList. This prints out all the elements of the list. The loop iterates through each Cheese object in the list. In each iteration, the variable cheese holds the current Cheese object at the specified index. Using Console.WriteLine, she prints the ID and Name properties of each element of cheese, showing how to access and display specific elements from a list in C#.
Searching for Cheese Using LINQ Query
In the video at 2:45, Layla Porter demonstrates how to search for a specific cheese based on user input using LINQ. She uses the ReadLine method to get the cheese name from the user:
string cheeseName = Console.ReadLine();string cheeseName = Console.ReadLine();While searching an item in the List, Layla highlights a very important key point at 2:51. She says, if we didn't use LINQ, we'd have to manually loop over each cheese in our collection to find a name that matches the user input, but LINQ's helper libraries handle this behind the scenes, making the process very efficient. The following code snippet demonstrate how Layla (3:40) iterates through the list elements without using a for loop just by using LINQ query syntax:
if (cheeseList.Any(cheese => cheese.Name == cheeseName))
{
    Cheese cheese = cheeseList.FirstOrDefault(c => c.Name == cheeseName);

    Console.WriteLine($"{cheese.Name} cheese costs £{cheese.Price.ToString()} and has a strength of {cheese.Strength}.");
}
else
{
    Console.WriteLine("I'm sorry, we don't have that cheese.");
}
if (cheeseList.Any(cheese => cheese.Name == cheeseName))
{
Cheese cheese = cheeseList.FirstOrDefault(c => c.Name == cheeseName);
Console.WriteLine($"{cheese.Name} cheese costs £{cheese.Price.ToString()} and has a strength of {cheese.Strength}.");
}
else
{
Console.WriteLine("I'm sorry, we don't have that cheese.");
}In the above code:
Layla explains that instead of manually looping through the list, we can use LINQ for a more efficient search. The
Anymethod checks if any cheese in the list matches the user-inputted name.If a match is found it means the element exists, the
FirstOrDefaultmethod retrieves the first cheese that matches the input name. This method is safe as it returns null if no match is found, preventing potential errors.- If the cheese is found, its Name, Price, and Strength are printed. If not, a message indicating that the cheese is not found is displayed.
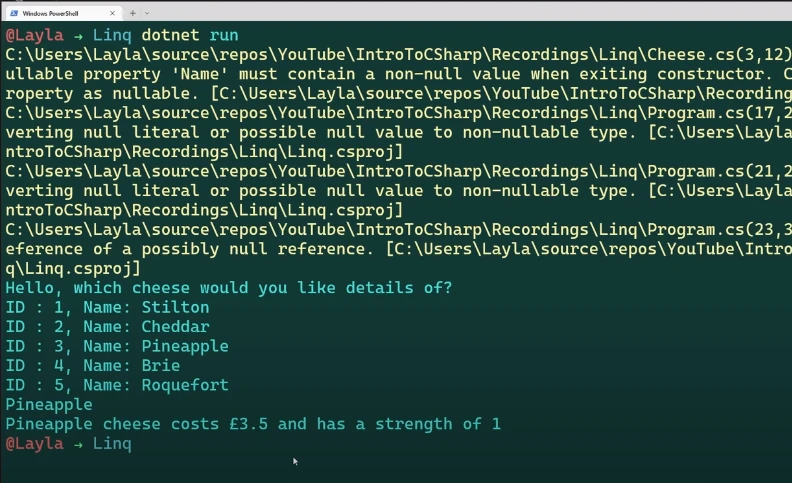
This approach showcases the efficiency and simplicity of using LINQ for searching collections in C#. The output of the code snippet is shown at 7:19: (Better image possible than below one?)

Handling Case Sensitivity while Searching
When working with strings, Layla at 8:00, reminds that it's important to remember that they are case-sensitive. To ensure that our cheese name comparisons are case-insensitive, we need to convert both the user's input and the cheese names in our list to lowercase using the .ToLower() method. This allows the user to input any type of capitalization, and our code will still correctly find the matching cheese. Just remember that string case sensitivity can be pesky, so handling it properly is crucial.
Practical Example: Querying Cheeses by Strength
At (8:50), Layla creates a practical example where the user can filter cheeses by their strength, demonstrating how to combine user input with LINQ queries.
1. User Input Prompt and Read
Console.WriteLine("What strength cheese are you interested in - choose between 1 and 5");
string strengthString = Console.ReadLine();
Console.WriteLine("What strength cheese are you interested in - choose between 1 and 5");
string strengthString = Console.ReadLine();Layla at 9:05, starts by asking the user to pick a strength value between 1 and 5. That's done with a simple Console.WriteLine asking for input, followed by Console.ReadLine() to grab what they type in.
2. Convert Input to Integer
bool isInt = int.TryParse(strengthString, out int strength);bool isInt = int.TryParse(strengthString, out int strength);Next, at 9:16 she makes sure their input is an actual number. She recommends using int.TryParse for that. If the input checks out and converts successfully to an integer, great! If not, well, we can handle that gracefully.
3. Filtering Cheeses by Strength
List<Cheese> cheeseByStrength = cheeseList.Where(c => c.Strength == strength).ToList();List<Cheese> cheeseByStrength = cheeseList.Where(c => c.Strength == strength).ToList();Now comes the fun part in Layla's video at 10:25. Here, she shows how to filter our list of cheeses i.e., cheeseList using LINQ. With LINQ's Where method and a quick lambda expression (c => c.Strength == strength), she pulls out just the cheeses that match the strength the user picked. This gives us a new list, cheeseByStrength.
4. Output Filtered Cheeses
foreach (var cheese in cheeseByStrength)
{
    Console.WriteLine($"Name: {cheese.Name} cheese");
}
foreach (var cheese in cheeseByStrength)
{
Console.WriteLine($"Name: {cheese.Name} cheese");
}Lastly at 12:03, to wrap things up nicely, Layla loops through cheeseByStrength with a foreach loop. For each cheese in that list, she prints out its name using specified predicate in Console.WriteLine. Simple and effective!
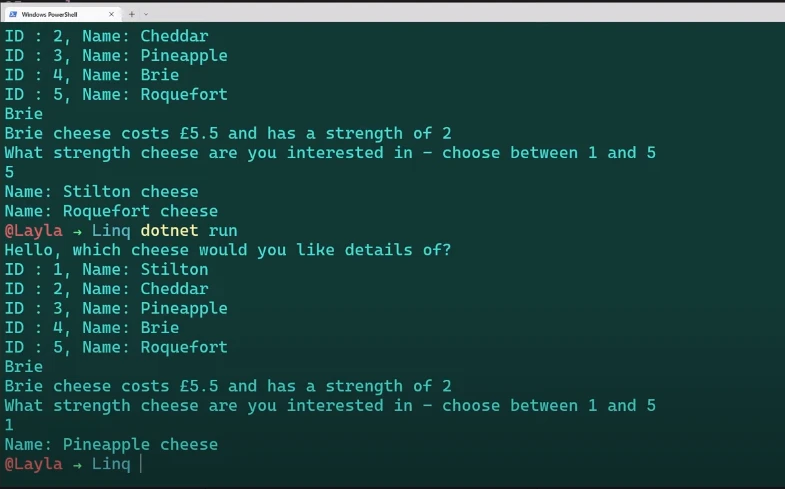
On executing the program at 12:17, Layla demonstrates how user inputs a strength value, and the list is filtered to display only cheeses with the specified strength. The sample output is shown below: (Better image possible?)

Conclusion
Layla’s video effectively introduces the concept of C# lists and how to query them using LINQ. By following her examples and explanations, beginners can gain a solid foundation in working with lists and querying data in C#. For more details and live coding sessions, check out Layla's YouTube channel and join her live streams.
Remember to explore the various methods and properties of the List class, such as the Count property, Insert method, predicate functions, and more, to enhance your understanding and ability to manipulate lists effectively.


