Creating C# Web Application with ASP.NET Core
Building web applications is a fundamental skill for modern developers, and understanding the core underlying project structures is essential. This article, inspired by Tim Corey's video on "Intro to Web API", dives into the complexities of building web apps using the ASP.NET Core framework.
By following Tim’s insights, we will explore how to set up, configure, and optimize your web application, leveraging the full potential of the ASP.NET Core framework to build efficient and maintainable web pages and APIs. Whether you are new to web development or looking to refine your skills, this guide will help you navigate the complexities of the web development workload, providing you with the knowledge needed to build effective and high-performance web applications.
Introduction
Tim Corey opens his tutorial by introducing the topic of creating APIs with ASP .NET Core. He emphasizes the significance of understanding API fundamentals for building robust and scalable web applications.
Tim sets the stage by explaining the critical role that APIs play in modern software development, facilitating communication between different web development frameworks like Blazor web server and Blazor web assembly. Even Razor pages' underlying project type is ASP.NET Core enabling seamless integration of various functionalities across multiple projects to build web apps.
Creating an ASP.NET Core Web API Project
To start, Tim Corey demonstrates how to set up a new ASP.NET Core Web API project. Here are the steps outlined in his video:
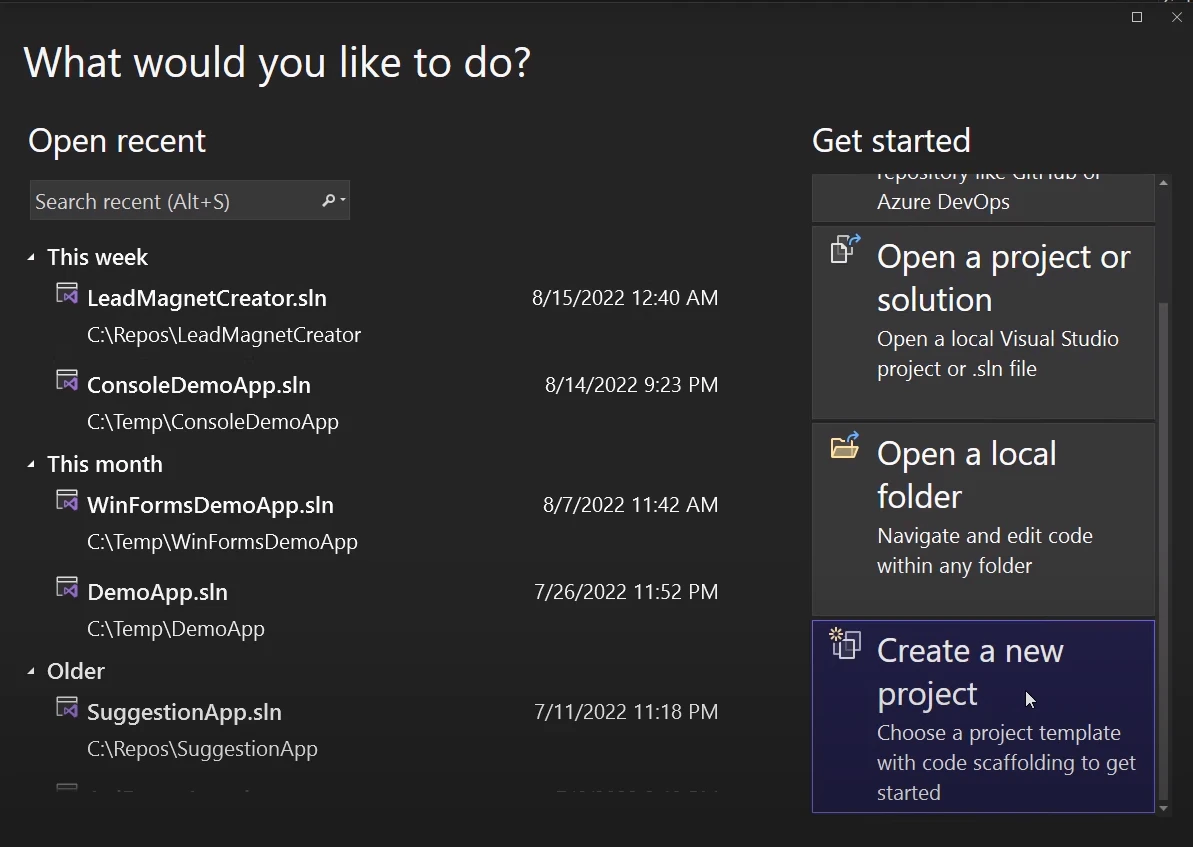
Open Visual Studio: Start by opening Visual Studio Installer and selecting the option to create a new project.
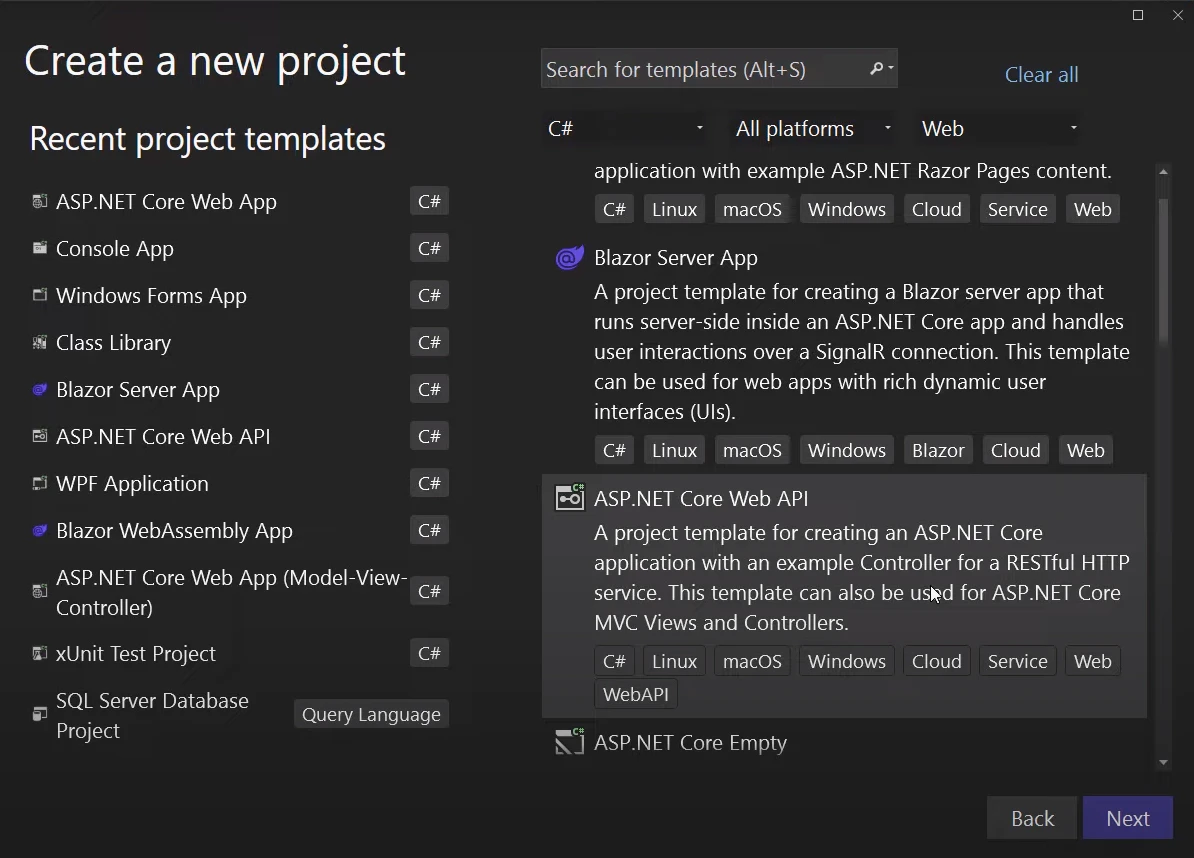
Choose the API Template: From the project templates, select "ASP.NET Core Web API" and click Next.
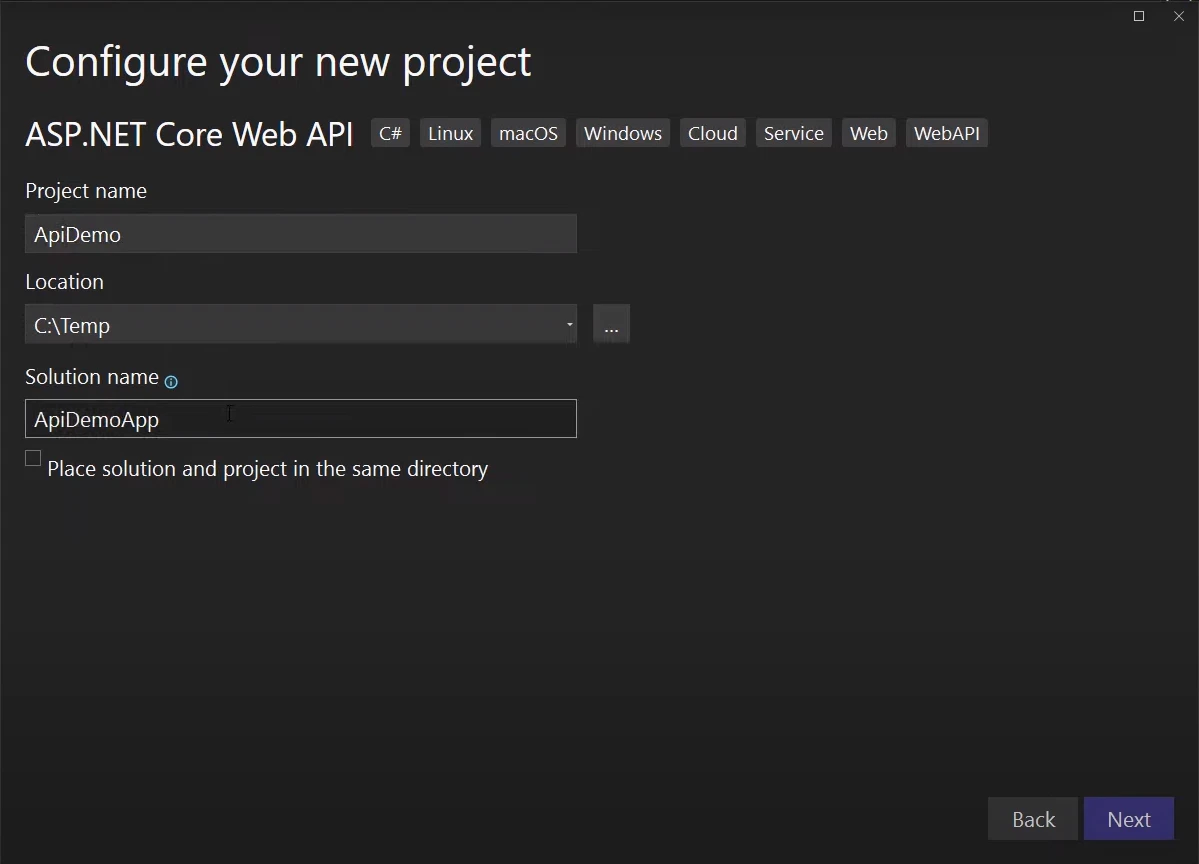
Configure Project Settings: Enter the project name, choose the location, and solution name.
Additional Information: Choose the .NET Framework, select Authentication type, and he recommends not changing other settings.
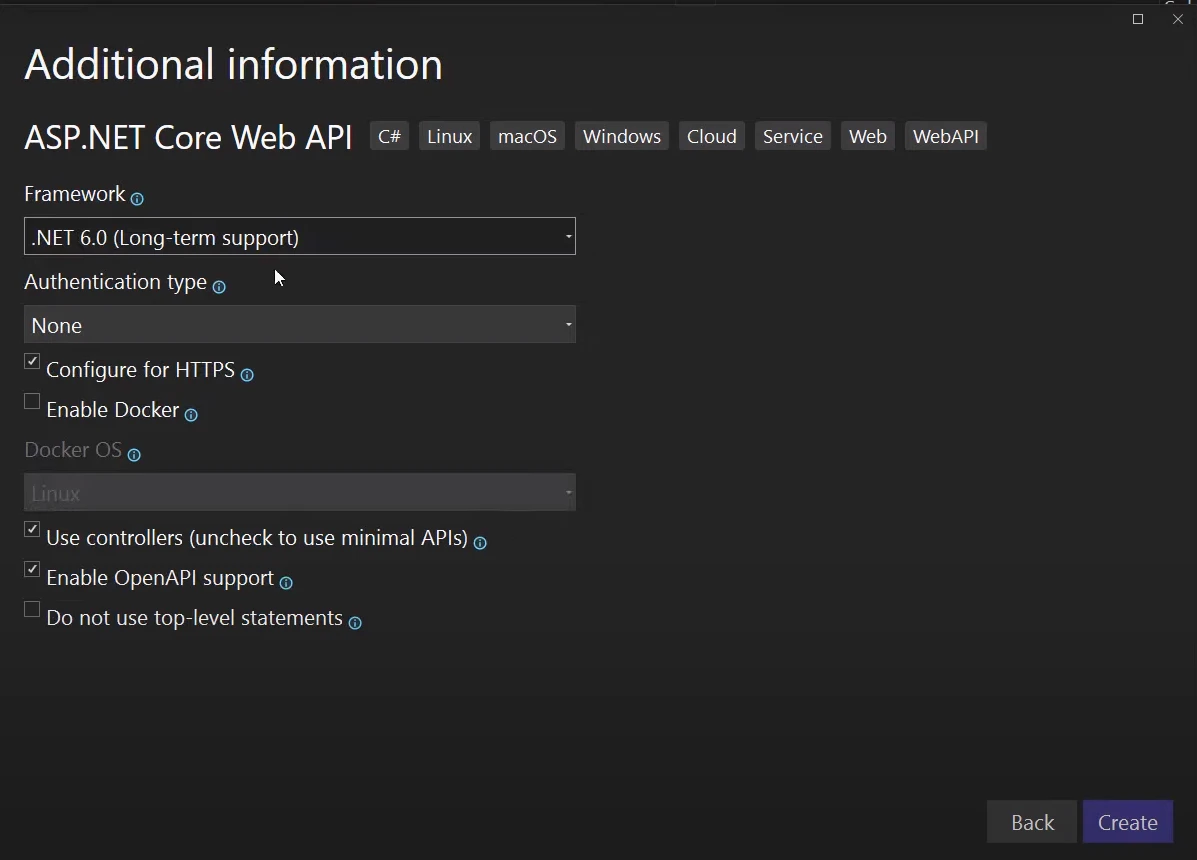
- Create the Project: Click "Create" to generate the project with the default configurations and necessary code.
This setup provides a foundation for exploring API development, with Visual Studio generating a basic structure that includes essential components like Program.cs, controllers folder, and appsettings.json.
Default API Application Overview
At 5:57 in Tim Corey’s video, he provides an overview of the default API application generated by ASP.NET Core.
Running the Default Application
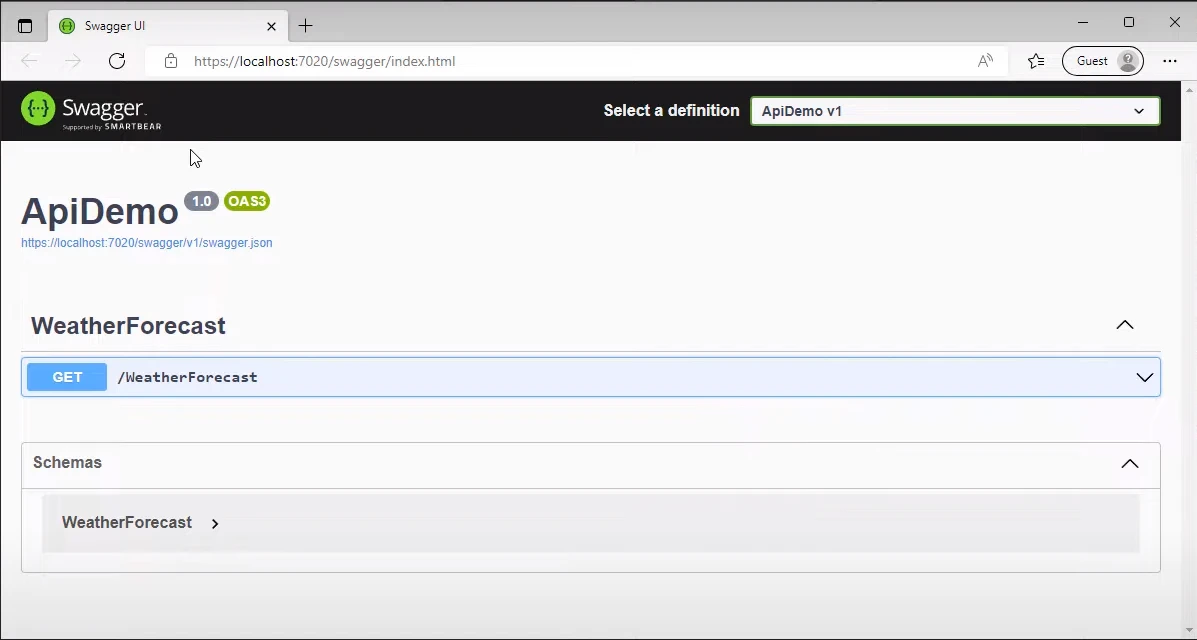
Tim begins by running the default application to illustrate what developers get out of the box. Upon execution, the project builds the API, downloads necessary NuGet packages, and launches a web page. This initial setup demonstrates the API's basic structure and functionalities without any modifications.
Interaction with the API
The web page that launches is powered by Swagger, now known as OpenAPI. Swagger provides a user-friendly interface for interacting with the API. It allows both developers and non-developers to understand and test the API endpoints easily. This interface is particularly beneficial for visualizing how the API works and for documentation purposes.
Exploring Swagger
Swagger showcases the available endpoints in the API. In the default setup, one of the pre-configured endpoints is the "weather forecast" endpoint. By clicking on this endpoint and using the "Try it out" feature, users can execute the API call and see the response. This response includes a weather forecast in JSON format, demonstrating how data is returned from the API.
Tim at 8:32 highlights that, while the raw JSON data might be challenging to read directly from the browser, Swagger’s documentation overlay makes it much more digestible. The documentation provides detailed information about the endpoint, including the request method (GET, POST, etc.), the structure of the returned data, and any required parameters.
JSON Documentation and API Versioning
Swagger also generates a JSON file as Tim points to it at 9:10, that documents the API in a machine-readable format. This documentation is crucial for other applications that need to interact with the API, as it describes the available endpoints, data schemas, and expected responses.
Tim at 9:29 points out the importance of versioning in APIs. The default setup includes a version indicator, hinting at the potential for multiple API versions. Versioning is vital for maintaining backward compatibility. When changes to the API might break existing clients, having multiple versions allows developers to introduce new features or changes without disrupting current users.
What is an API
At the 11:22 mark, Tim Corey explains the fundamental role of APIs (Application Programming Interfaces) in modern web development. He emphasizes their importance in managing and securing data exchanges between different software components.
Purpose of APIs
Tim stresses that most applications revolve around data—retrieval, manipulation, and display. APIs serve as intermediaries between the user interface and the underlying data, providing a secure and efficient means of data access. This centralization is crucial for several reasons:
Security: APIs offer a secure way to manage data access. Mobile and client-side applications shouldn't directly connect to databases to avoid embedding database credentials within the client code, which poses significant security risks.
- Abstraction: APIs abstract the data layer from the user interface, enabling different client applications (mobile apps, web apps, desktop apps) to interact with the same data source without exposing the database or its credentials.
Versatility in Different Frameworks
Tim notes that APIs are not limited to specific frameworks or languages. For example, a C# API can be accessed by JavaScript frameworks like Angular, React, or Vue, showcasing the cross-platform capabilities of APIs.
API Web App Code Review
At the 15:21, Tim Corey begins a detailed walkthrough of the structure and functionality of an ASP.NET Core API project. Below are the key points for his explanations which are necessary to understand when working with HTTP server and server-side technologies while creating an API web apps:
1. Overview of Program.cs
Tim reviews Program.cs, noting it builds the web application and configures services like dependency injection for controllers and Swagger (OpenAPI). The code sets up essential services before building and running the application.
using Microsoft.AspNetCore.Builder;
using Microsoft.Extensions.DependencyInjection;
using Microsoft.Extensions.Hosting;

var builder = WebApplication.CreateBuilder(args);

// Add services to the container.
builder.Services.AddControllers();
// Learn more about configuring Swagger/OpenAPI at https://aka.ms/aspnetcore/swashbuckle
builder.Services.AddEndpointsApiExplorer();
builder.Services.AddSwaggerGen();

var app = builder.Build();

// Configure the HTTP request pipeline.
if (app.Environment.IsDevelopment())
{
    app.UseSwagger();
    app.UseSwaggerUI();
}

app.UseHttpsRedirection();

app.UseAuthorization();

app.MapControllers();

app.Run();
using Microsoft.AspNetCore.Builder;
using Microsoft.Extensions.DependencyInjection;
using Microsoft.Extensions.Hosting;
var builder = WebApplication.CreateBuilder(args);
// Add services to the container.
builder.Services.AddControllers();
// Learn more about configuring Swagger/OpenAPI at https://aka.ms/aspnetcore/swashbuckle
builder.Services.AddEndpointsApiExplorer();
builder.Services.AddSwaggerGen();
var app = builder.Build();
// Configure the HTTP request pipeline.
if (app.Environment.IsDevelopment())
{
app.UseSwagger();
app.UseSwaggerUI();
}
app.UseHttpsRedirection();
app.UseAuthorization();
app.MapControllers();
app.Run();2. Environment Configuration
Tim explains how environment settings are configured in launchSettings.json. The default environment is set to "Development" for local testing, enabling Swagger. In production, Swagger is typically disabled for security, but it can be enabled by removing the development check.
{
  "profiles": {
    "IIS Express": {
      "commandName": "IISExpress",
      "launchBrowser": true,
      "environmentVariables": {
        "ASPNETCORE_ENVIRONMENT": "Development"
      }
    },
    "WebApplication": {
      "commandName": "Project",
      "launchBrowser": true,
      "applicationUrl": "https://localhost:5001;http://localhost:5000",
      "environmentVariables": {
        "ASPNETCORE_ENVIRONMENT": "Development"
      }
    }
  }
}
3. HTTPS Redirection and Controllers
Tim points out the HTTPS redirection and the mapping of controllers. This setup ensures API routes are properly configured. He prefers using an "api" prefix for clarity in the HTTP request and response routes, which can be modified to ensure API paths are distinct.
4. Weather Forecast Controller
Tim dives into WeatherForecastController.cs, highlighting the route configuration. The default route is /weatherforecast, which can be modified to include an "api" prefix. The controller uses HTTP GET to retrieve data, which can be accessed via the specified route.
using Microsoft.AspNetCore.Mvc;

[ApiController]
[Route("[controller]")]
public class WeatherForecastController : ControllerBase
{
    private static readonly string[] Summaries = new[]
    {
        "Freezing", "Bracing", "Chilly", "Cool", "Mild", "Warm", "Balmy", "Hot", "Sweltering", "Scorching"
    };

    private readonly ILogger<WeatherForecastController> _logger;

    public WeatherForecastController(ILogger<WeatherForecastController> logger)
    {
        _logger = logger;
    }

    [HttpGet]
    public IEnumerable<WeatherForecast> Get()
    {
        return Enumerable.Range(1, 5).Select(index => new WeatherForecast
        {
            Date = DateTime.Now.AddDays(index),
            TemperatureC = Random.Shared.Next(-20, 55),
            Summary = Summaries[Random.Shared.Next(Summaries.Length)]
        })
        .ToArray();
    }
}

public class WeatherForecast
{
    public DateTime Date { get; set; }

    public int TemperatureC { get; set; }

    public string? Summary { get; set; }
}
using Microsoft.AspNetCore.Mvc;
[ApiController]
[Route("[controller]")]
public class WeatherForecastController : ControllerBase
{
private static readonly string[] Summaries = new[]
{
"Freezing", "Bracing", "Chilly", "Cool", "Mild", "Warm", "Balmy", "Hot", "Sweltering", "Scorching"
};
private readonly ILogger<WeatherForecastController> _logger;
public WeatherForecastController(ILogger<WeatherForecastController> logger)
{
_logger = logger;
}
[HttpGet]
public IEnumerable<WeatherForecast> Get()
{
return Enumerable.Range(1, 5).Select(index => new WeatherForecast
{
Date = DateTime.Now.AddDays(index),
TemperatureC = Random.Shared.Next(-20, 55),
Summary = Summaries[Random.Shared.Next(Summaries.Length)]
})
.ToArray();
}
}
public class WeatherForecast
{
public DateTime Date { get; set; }
public int TemperatureC { get; set; }
public string? Summary { get; set; }
}5. HTTP Verbs and Routing
Tim explains how HTTP verbs (GET, POST, PUT, DELETE) define API endpoints. For a GET request, the browser calls the specified method in the controller. Other verbs require tools like Postman for testing.
Creating an API Controller
Tim demonstrates the process of creating an API controller:
Adding a Controller: Right-click on the "Controllers" folder and select "Add > Controller."
Choosing API Controller: Select "API Controller - Empty" and provide a name for the controller.
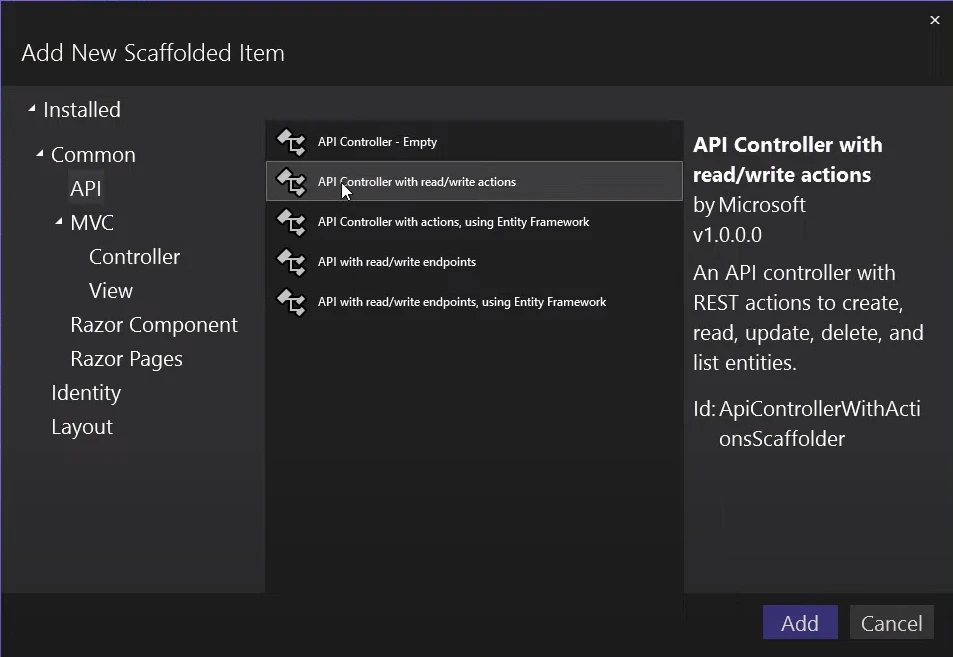
- Defining Actions: Implement actions within the controller to handle different HTTP requests. Tim provides code examples showing how to define GET, POST, PUT, and DELETE methods. For detailed code please refer to the video from 26:25 onwards.
This hands-on demonstration helps developers understand how to build and configure API controllers for handling various types of requests.
REST API
Tim Corey introduces REST (Representational State Transfer) and its principles:
What is REST: REST is an architectural style for designing networked applications. It relies on stateless communication and uses standard HTTP methods (GET, POST, PUT, DELETE) to perform operations.
RESTful Principles: RESTful APIs use URL patterns to represent resources. For example,
/usersretrieves all users, while/users/5retrieves a specific user with ID 5.- REST Compliance: Tim notes that achieving full REST compliance can be challenging, as REST was originally a theoretical model. However, adhering to REST principles can lead to more intuitive and consistent APIs.
Tim emphasizes that while aiming for REST compliance, practical considerations should guide API design to ensure usability and functionality.
Minimal API Application
Corey introduces Minimal APIs, a streamlined approach to API development in ASP.NET Core:
Setting Up Minimal APIs: Tim shows how to create a Minimal API project by unchecking the "Use Controllers" option when setting up the project.
Simplified Code: Minimal APIs eliminate the need for controllers and routing attributes, allowing developers to define endpoints directly in
Program.csusing methods likeapp.MapGet(),app.MapPost(), etc.- Code Example: Tim provides a code example where a single line of code defines an endpoint. He demonstrates how to map a GET request to an endpoint with minimal configuration.
using Microsoft.AspNetCore.Builder;
using Microsoft.Extensions.Hosting;

var builder = WebApplication.CreateBuilder(args);
var app = builder.Build();

app.MapGet("/", () => "Hello World!");

app.Run();
using Microsoft.AspNetCore.Builder;
using Microsoft.Extensions.Hosting;
var builder = WebApplication.CreateBuilder(args);
var app = builder.Build();
app.MapGet("/", () => "Hello World!");
app.Run();Minimal APIs are designed to simplify development, especially for smaller applications or microservices.
Why the Minimal API
Tim discusses the benefits of Minimal APIs:
Create New Project: Tim creates a new Web API project but this time in additional information he unchecked use controllers option. This allows the creation of project to use minimal APIs.
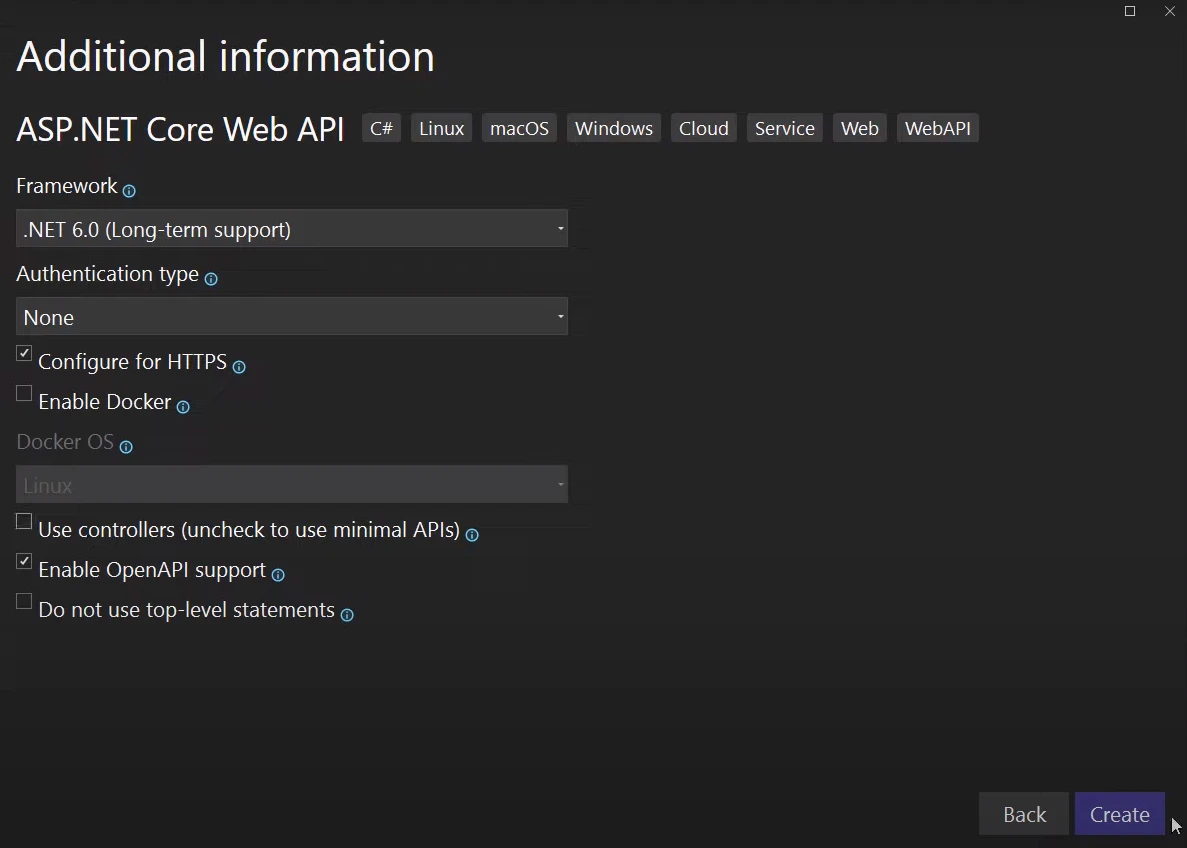
Reduced Boilerplate: Minimal APIs reduce the amount of boilerplate code by removing the need for controllers and additional routing configurations.
Simplicity: They offer a more straightforward approach for simple APIs, making it easier to understand and maintain the code.
- Microservices: Minimal APIs are particularly useful for microservices, where the API needs to perform a limited set of actions and doesn’t require the full feature set of traditional controllers.
Tim acknowledges that while Minimal APIs are beneficial for certain scenarios, traditional controllers might be more appropriate for larger or more complex applications.
Best Practices, Summary, and Final Remarks
Tim Corey wraps up his tutorial with best practices for API development:
Separation of Concerns: Avoid placing business logic directly in
Program.csor controller actions. Instead, move logic to separate class libraries or services to maintain code cleanliness and adhere to SOLID principles.API as a User Interface: Treat APIs as a user interface, focusing on making them intuitive and well-documented. Tim emphasizes the importance of clear documentation and effective API design.
Swagger and Documentation: Utilize Swagger for API documentation and versioning. Tim explains how XML comments in code can be used to generate detailed API documentation.
- Additional Considerations: Consider caching, rate limiting, and other factors to enhance API performance and security.
Tim encourages developers to explore different project types and tools, emphasizing the value of understanding APIs and their role in modern software development.
Conclusion
Tim Corey’s video provides a thorough guide on creating and managing APIs in ASP.NET Core, covering both RESTful and Minimal API approaches. His insights not only help developers grasp the essentials of API design but also offer practical advice for implementing effective solutions.
For more in-depth tutorials and insights on C# and other project types, be sure to visit Tim Corey’s YouTube channel, IAmTimCorey.
